链表的定义 C++定义链表方式,如下所示:
1 2 3 4 5 6 struct ListNode { int val; ListNode *next; ListNode(int x) : val(x), next(NULL ) {} }
自定义构造函数与默认构造函数的区别:
1 ListNode* head = new ListNode(5 );
1
2
ListNode* head = new ListNode(); head->val = 5 ;
所以如果不定义构造函数使用默认构造函数的话,在初始化的时候就不能直接给变量赋值。
设置一个虚拟头结点 ,这样原链表的所有节点就都可以按照统一的方式进行移除
1
2
3
4
5
6
7
8
9
10
11
12
13
14
15
16
17
18
19
20
class Solution {public : ListNode* removeElements (ListNode* head, int val) { ListNode* dummyHead = new ListNode(0 ); dummyHead->next = head; ListNode* cur = dummyHead; while (cur->next != NULL ) { if (cur->next->val == val) { ListNode* tmp = cur->next; cur->next = cur->next->next; delete tmp; } else { cur = cur->next; } } head = dummyHead->next; delete dummyHead; return head; } };
LeetCode 707. 设计链表
1
2
3
4
5
6
7
8
9
10
11
12
13
14
15
16
17
18
19
20
21
22
23
24
25
26
27
28
29
30
31
32
33
34
35
36
37
38
39
40
41
42
43
44
45
46
47
48
49
50
51
52
53
54
55
56
57
58
59
60
61
62
63
64
65
66
67
68
69
70
71
72
73
74
75
76
77
78
79
80
81
82
83
84
85
86
87
88
89
90
91
92
93
class MyLinkedList {public : struct LinkedNode { int val; LinkedNode* next; LinkedNode(int val):val(val), next(nullptr ){} }; MyLinkedList() { _dummyHead = new LinkedNode(0 ); _size = 0 ; } int get (int index) if (index > (_size - 1 ) || index < 0 ) { return -1 ; } LinkedNode* cur = _dummyHead->next; while (index--){ cur = cur->next; } return cur->val; } void addAtHead (int val) LinkedNode* newNode = new LinkedNode(val); newNode->next = _dummyHead->next; _dummyHead->next = newNode; _size++; } void addAtTail (int val) LinkedNode* newNode = new LinkedNode(val); LinkedNode* cur = _dummyHead; while (cur->next != nullptr ){ cur = cur->next; } cur->next = newNode; _size++; } void addAtIndex (int index, int val) if (index > _size) return ; if (index < 0 ) index = 0 ; LinkedNode* newNode = new LinkedNode(val); LinkedNode* cur = _dummyHead; while (index--) { cur = cur->next; } newNode->next = cur->next; cur->next = newNode; _size++; } void deleteAtIndex (int index) if (index >= _size || index < 0 ) { return ; } LinkedNode* cur = _dummyHead; while (index--) { cur = cur ->next; } LinkedNode* tmp = cur->next; cur->next = cur->next->next; delete tmp; _size--; } void printLinkedList () LinkedNode* cur = _dummyHead; while (cur->next != nullptr ) { cout << cur->next->val << " " ; cur = cur->next; } cout << endl ; } private : int _size; LinkedNode* _dummyHead; };
首先定义一个cur指针,指向头结点,再定义一个pre指针,初始化为null。
然后就要开始反转了,首先要把 cur->next 节点用tmp指针保存一下,也就是保存一下这个节点。
为什么要保存一下这个节点呢,因为接下来要改变 cur->next 的指向了,将cur->next 指向pre ,此时已经反转了第一个节点了。
接下来,就是循环走如下代码逻辑了,继续移动pre和cur指针。
最后,cur 指针已经指向了null,循环结束,链表也反转完毕了。 此时我们return pre指针就可以了,pre指针就指向了新的头结点。
1
2
3
4
5
6
7
8
9
10
11
12
13
14
15
16
class Solution {public : ListNode* reverseList (ListNode* head) { ListNode* temp; ListNode* cur = head; ListNode* pre = NULL ; while (cur) { temp = cur->next; cur->next = pre; pre = cur; cur = temp; } return pre; } };
1
2
3
4
5
6
7
8
9
10
11
12
13
14
15
16
17
18
19
class Solution {public : ListNode* swapPairs (ListNode* head) { ListNode* dummyHead = new ListNode(0 ); dummyHead->next = head; ListNode* cur = dummyHead; while (cur->next != nullptr && cur->next->next != nullptr ) { ListNode* tmp = cur->next; ListNode* tmp1 = cur->next->next->next; cur->next = cur->next->next; cur->next->next = tmp; cur->next->next->next = tmp1; cur = cur->next->next; } return dummyHead->next; } };
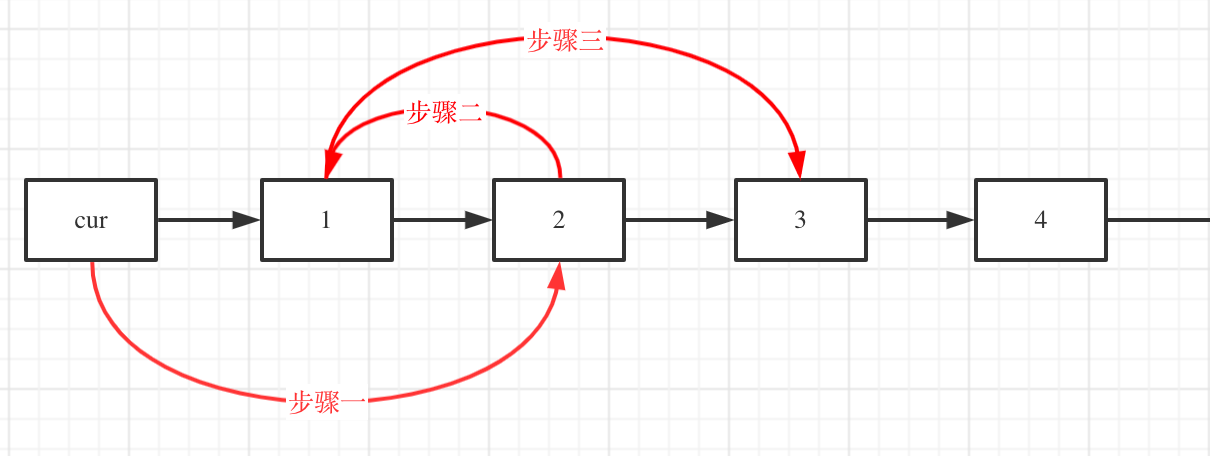
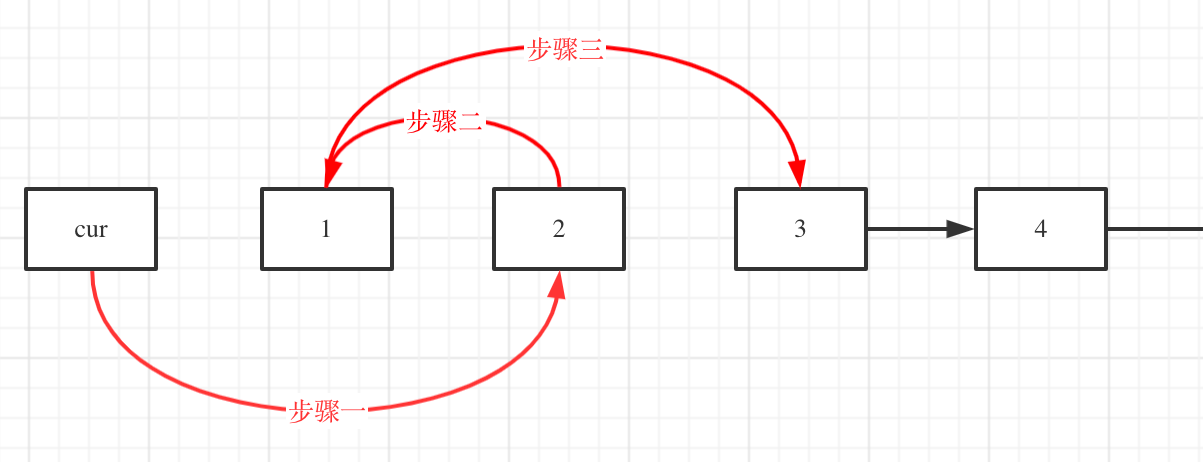
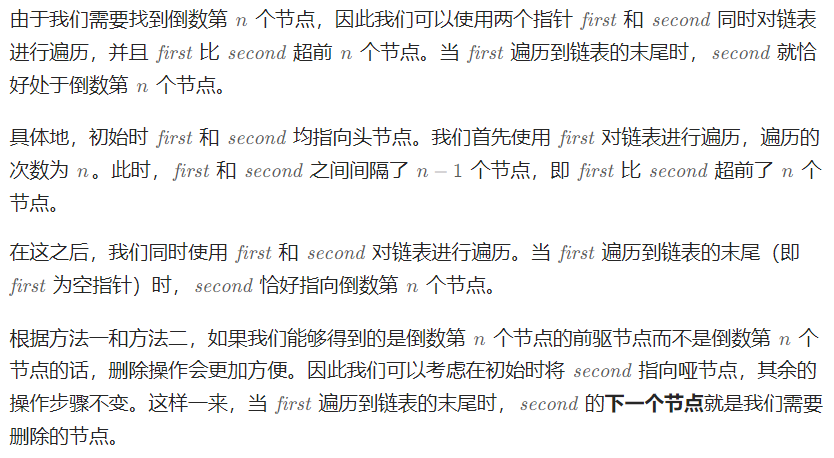
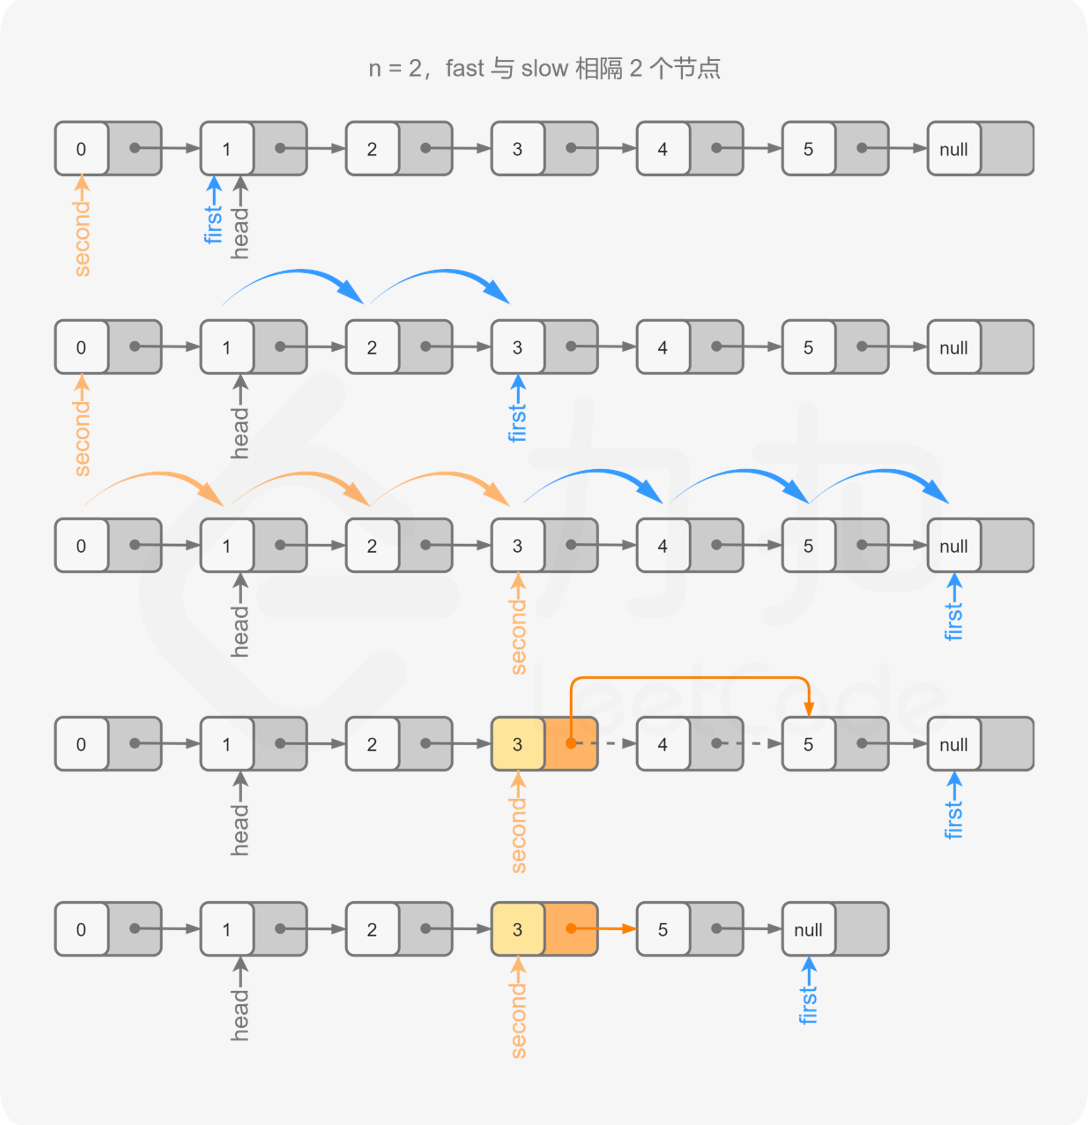
LeetCode 19. 删除链表的倒数第N个结点
1
2
3
4
5
6
7
8
9
10
11
12
13
14
15
16
17
18
19
20
21
22
23
class Solution {public : ListNode* removeNthFromEnd (ListNode* head, int n) { ListNode* dummyHead = new ListNode(0 ); dummyHead->next = head; ListNode* first = head; ListNode* second = dummyHead; while (n-- && first != NULL ) { first = first->next; } while (first) { first = first->next; second = second->next; } second->next = second->next->next; ListNode* ans = dummyHead->next; delete dummyHead; return ans; } };
简单来说,就是求两个链表交点节点的指针 。 这里同学们要注意,交点不是数值相等,而是指针相等。
为了方便举例,假设节点元素数值相等,则节点指针相等。
看如下两个链表,目前curA指向链表A的头结点,curB指向链表B的头结点:
我们求出两个链表的长度,并求出两个链表长度的差值,然后让curA移动到,和curB 末尾对齐的位置,如图:
此时我们就可以比较curA和curB是否相同,如果不相同,同时向后移动curA和curB,如果遇到curA == curB,则找到交点。
否则循环退出返回空指针。
1
2
3
4
5
6
7
8
9
10
11
12
13
14
15
16
17
18
19
20
21
22
23
24
25
26
27
28
29
30
31
32
33
34
35
36
37
38
class Solution {public : ListNode *getIntersectionNode (ListNode *headA, ListNode *headB) { ListNode* curA = headA; ListNode* curB = headB; int lenA = 0 , lenB = 0 ; while (curA != NULL ) { lenA++; curA = curA->next; } while (curB != NULL ) { lenB++; curB = curB->next; } curA = headA; curB = headB; if (lenB > lenA) { swap (lenA, lenB); swap (curA, curB); } int gap = lenA - lenB; while (gap--) { curA = curA->next; } while (curA != NULL ) { if (curA == curB) { return curA; } curA = curA->next; curB = curB->next; } return NULL ; } };
LeetCode 142. 环形链表II
遍历链表中的每个节点,并将它记录下来;一旦遇到了此前遍历过的节点,就可以判定链表中存在环
1
2
3
4
5
6
7
8
9
10
11
12
13
14
class Solution {public : ListNode *detectCycle (ListNode *head) { unordered_set <ListNode *> visited; while (head != NULL ) { if (visited.count(head)) { return head; } visited.insert(head); head = head->next; } return NULL ; } };

 Wechat
 Alipay